
Manage a legacy integration
Legacy API configuration settings

Converted legacy Web Builder integrations have slightly different API Configuration tabs for authentication, triggers, and actions then integrations (and new triggers or actions) built in Platform UI. In new integrations, each API field will let you set the API call settings in a form, or switch to Code Mode to add custom JavaScript code for that call and its response parsing. In converted integrations, however, you will see static text fields for each API call URL. If you need to customize the API call or response bundle parsing, you will need to do so from the Legacy Scripting settings.
Where’s my code?
To find your find your previous code:
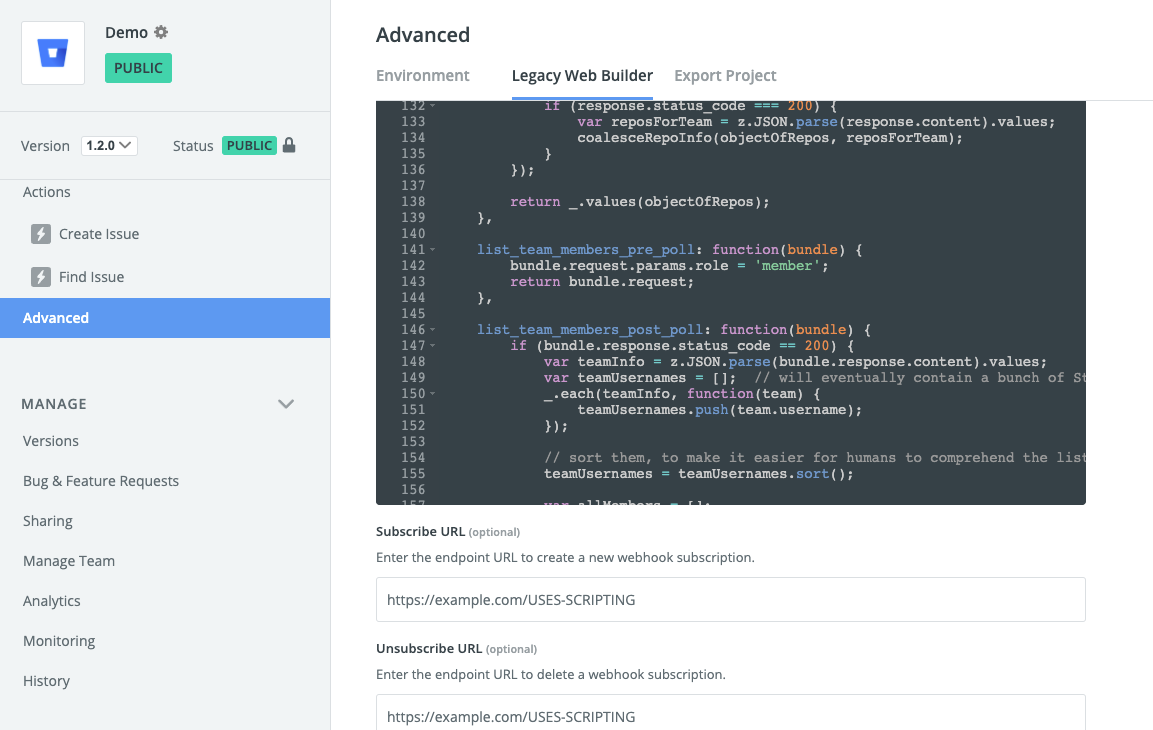
- Log into the Platform UI.
- Select your integration.
- In the Build section in the left sidebar, click your Advanced.
- Click the Legacy Web Builder tab.
Your converted integration looks a little different than if you’d started it from scratch in the Platform UI, but should feel pretty familiar (apart from versioning). One thing you may notice are sections where the configuration is a code block, and the code is calling z.legacyScripting.run(). To make integrations written in the old environment run without modification, in the new environment Zapier ‘wraps’ your custom code and API configuration, and created a runtime library that emulates the behavior of the old platform. So each time you see this, you can recognize it as an artifact of this emulation - we’re calling into the emulator to perform the operation we need using your original code and configuration.
Where you added custom scripting code, the z.legacyScripting will call these functions to drive your triggers, actions, and authentication transactions.
You can edit this code as before, this time in a redesigned editor that does not take up your full screen. Be sure to click Save after editing your integration code, as Zapier does not auto-save changes.
Note: Zapier recommends to understand versioning model of the Platform UI before making any code changes.
→ Find detailed documentation on how to edit your integration’s code in Legacy Scripting.
What is not included in Platform UI?
Platform UI includes most of the features you would expect from the legacy Web Builder, along with new features to help better manage your integration. In converted integrations, you will see some additional features to manage existing authentication, triggers, and actions. If you add new triggers or actions to your integration, though, these features will not be available in the new items, including:
- Scripting: The legacy Web Builder combined all code into one Scripting page that let you add custom code for authentication, triggers, actions, and response data parsing. If you add new triggers or actions to your integration, though, use Code Mode to customize your API call or response bundle parsing. Learn more in legacy scripting.
- Custom results fields: The legacy Web Builder included an option in triggers and actions to make an API call that would fetch custom result field names. The Platform UI does not include this option for new triggers and actions, though it does let you continue to use this option in converted, existing triggers and actions. If you add new triggers or actions to your integration and need to fetch custom results fields, you will need to add that to the trigger or action’s API call in the code mode.
- OAuth v1: Platform UI does not support OAuth v1 for new integrations, and instead requires new integrations to use OAuth v2 authentication. You may continue to maintain existing OAuth v1 authentication in converted integrations, but if you make a new version of your integration or re-build it in Platform UI, you will need to use a newer authentication scheme.
- Advanced Editor: The legacy Web Builder included an Advanced Editor option to edit your integration in JSON text instead of the web UI editor. That feature is no longer available in Platform UI, for new or converted integrations. If you would prefer to manage your integration in JSON text and code, the better option would be to export your integration to Platform CLI to manage it from your local development environment. Once your app has been converted to the Platform UI, you will have the option of exporting your app to Platform CLI.
- Files: The legacy Web Builder included some support for file handling. The Platform UI does not include capabilities for working with files. To work with files, export your app to the CLI after it is converted.
Creating new triggers and actions
You’ll be able to continue your development, creating new triggers and actions, in your converted Web Builder integration. When you create a new trigger or action, the interface will look a little bit different than those triggers and actions that were converted over from the legacy platform. It will look familiar to you. The big difference is when configuring an HTTP API request, you’ll have many more options to customize headers and parameters without having to write custom code. And when you do need to use custom code, you’ll do so in that trigger/actions’s UI, rather than in a common script file. We’ll talk about differences in the scripting environment next.
Differences when writing custom scripting code
The following applies when you’re building new triggers and actions, and working with custom scripting code. These are the idioms of the way operations are executed on the new platform.
Note: If you’re making changes to the code in the Legacy Web Builder tab, the following statements do not apply. That code is run in an “emulated” context and works just like the old environment.
Code is scoped to the individual trigger or action
When you’re writing custom scripting code in the new platform the scope of that code is local to that trigger or action. This makes it easier to understand when a request will be handled by custom code, or simply configuring a request for default request handling. It also means you can’t easily share code between different triggers and actions. For that, have a look at moving to the Zapier CLI, which is geared toward teams, projects with custom code, projects that need 3rd party libraries, etc.

Tip: A handy way to understand this is to have a look at the schema of the integration definition you’re building. Here you’ll see the structure of the definition of a polling trigger. Notice that the
performfield takes a request configuration object, or it simply takes a Javascript function. The Platform UI reflects this. When you configure an API interaction, you use the Form Mode to configure a request, or you use Code Mode to write a function to be called instead.
No pre or post functions
In the legacy Web Builder, you could write custom code that ran before the request was made, or after the request returned, or you could take over complete control of making the request and returning data to Zapier. In Platform UI, there is only the ‘complete control’ option. Your request can implement a perform function that takes a bundle as input and is expected to return data when the request handling is completed.
Promise based API
A big difference in the API of the new environment is that the request API is asynchronous, using promises rather than synchronous requests or callbacks. For developers new to Javascript promises this can be a small stumbling block. We recommend spending a few minutes getting familiar with how promises work in general. The z.request library works very similarly to the promise-based Fetch API, so most articles and tutorials about that apply to working with custom code in Zapier’s environment.
- Using promises (MDN)
- JavaScript Promises in Depth (Egghead.io)
- Using Fetch (MDN)
- A re-introduction to JavaScript (MDN)
No libraries included
The legacy Web Builder tool included several JavaScript libraries, such as Underscore and jQuery, in its context that you could use in your script code. Those are no longer available when writing scripting code in the Platform UI. You’ll be able to use any JavaScript feature of Node.js (version 12 at the time of this writing, possibly v14 by the time you’re reading this), including its standard library with z.require.
If you need, or prefer to use, a 3rd party Javascript library you’ll want to switch to the Platform CLI where you can install modules from npm and reference them throughout your code.
Structure and naming of the Bundle Object is different
Field names and structure of the Bundle is slightly different between the Legacy Web Builder and the new platform. Learn more details in our Bundle docs.